Neckgraft Course

Parts 1 & 2
- 30 hours of instruction, professionally filmed and edited to approximately 12 hours
- 25 Chapters of in-depth explanation and demonstration of how to do a violin neck graft from beginning to end
- Each of the 25 lectures/videos has a comment section where you can ask questions and start a conversation with myself and other users
- Life time access to all 25 videos on Teachable as well as downloadable PDF files of measurements, templates and a materials and tools list
- The equivalent of a 2-weeks course of in-person teaching at less than half the price
- English, Spanish and Mandarin Chinese subtitles available
- Upon completion of the course you will be issued with a certificate
This Online Violin Neck Graft Course consists of 2 Parts which can be purchased individually
Part 1
Includes the following chapters/videos
1. Introduction, choosing and planing the neck block
2. Fitting, gluing and trimming back the peg bushings
3. Sawing off the neck and chopping out the neck root
4. Removing the old French neck graft
5. Fitting and gluing pieces of wood into the French neck graft cut-outs
6. Fingerboard preparation
7. Establishing the 3 flat surfaces inside the pegbox
8. Transferring angles and band sawing of the neck block
9. Fitting the neck graft
10. Gluing the neck graft
11. Establishing the neck surface for the fingerboard
12. Positioning and gluing the fingerboard onto the neck
13. Removing excess wood from the neck and shaping top and bottom surface of the fingerboard
14. Establishing the pegbox, roughly shaping the neck and the nut
15. Finalising the nut and fingerboard and conclusion
Part 2
Includes the following chapters/videos
1. Introduction and preparation of the top block mortice
2. Fitting and gluing the neck
3. Shaping the neck and application of filler varnish onto the peg bushings
4. Staining the neck
5. Retouch overview, application of clear varnish, scraping of the filler varnish on the peg bushings and retouching of the peg bushings
6. Application and scraping down of filler varnish along the joints
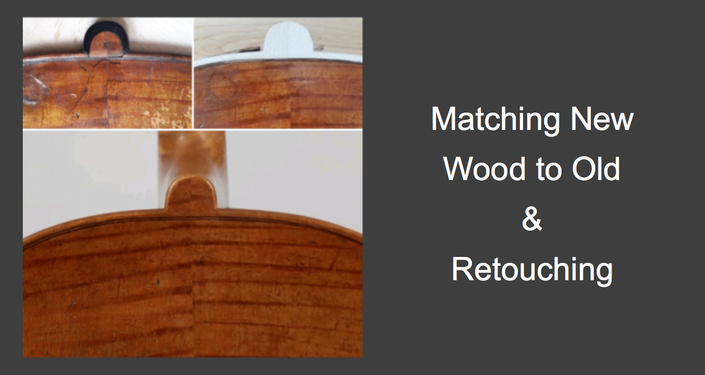
7. Retouching of the neck graft area
8. Retouching of the neck heel area
9. Applying patina, oiling the neck and finishing the nut and fingerboard
10. Explanation of the positioning of the peg holes and conclusion
Included in this course are downloadable PDF files of neck graft measurements, templates and a materials and tools list
This Course has the optional extra of English, Spanish and Mandarin Chinese subtitles and may have other language subtitles added in future depending on demand

French neck graft cut-outs filled
I'm not keen on French neck grafts because of the end grain stops a the top. As the previous French neck graft had been cut quite high into the pegbox, I decided to fill those areas and then do my usual through graft.

End of Part 1
By the end of Part 1, the woodwork around the neck graft is pretty much completed and the neck roughly shaped, ready to be fitted.

End of Part 2
Apart from drilling out the peg-holes and fitting the pegs, every single step from beginning to end is explained and demonstrated in detail throughout the 25 chapters.
Violin Neck Graft Course Part 1 & 2
- 1. Introduction, choosing and planing the neck block (10:56)
- 2. Fitting, gluing and trimming back the peg bushings (23:50)
- 3. Sawing off the neck and chopping out the neck root (10:46)
- 4. Removing the old French neck graft (17:30)
- 5. Fitting and gluing pieces of wood into the French neck graft cut-outs (27:47)
- 6. Fingerboard preparation (24:43)
- 7. Establishing the 3 flat surfaces inside the pegbox (23:48)
- 8. Transferring angles and band sawing of the neck block (14:18)
- 9. Fitting the neck graft (21:43)
- 10. Gluing the neck graft (15:12)
- 11. Establishing the neck surface for the fingerboard (22:46)
- 12. Positioning and gluing the fingerboard onto the neck (30:05)
- 13. Removing excess wood from the neck and shaping top and bottom surface of the fingerboard (18:17)
- 14. Establishing the pegbox, roughly shaping the neck and the nut (55:23)
- 15. Finalising the nut and fingerboard and conclusion (13:23)
- 1. Introduction and preparation of the top block mortice (22:15)
- 2. Fitting and gluing the neck (110:48)
- 3. Shaping the neck and application of filler varnish onto the peg pushings (42:59)
- 4. Staining the neck (33:39)
- 5. Retouch overview, application of clear varnish and scraping of the filler varnish on the peg bushings (73:04)
- 6. Application and scraping down of filler varnish along the joints (16:33)
- 7. Retouching of the neck graft area (54:06)
- 8. Retouching of the heel area (31:46)
- 9. Applying patina, oiling the neck and finishing the nut and fingerboard (12:43)
- 10. Explanation of the positioning of the peg holes and conclusion (6:11)
A Glimpse into Part 1
A Glimpse into Part 2
“This online course offers a detailed presentation of how to fit a new violin neck from choosing the wood through to the final retouching. A task that would normally take thirty hours has been compressed into 12 hours of tuition, divided in two halves. These are subdivided into 25 chapters that break down the various operations into manageable stages, all expertly demonstrated at the bench with thorough and detailed explanations supported with clear subtitles throughout as an optional extra. The course offers a unique insight into the workshop practices of a skilled restorer and internationally respected teacher with over 25 years of experience. Neck grafts can be complicated, time consuming and not always well executed, I recommend this course to anyone wishing to learn this important and frequently required repair.”
Andrew Fairfax
Fairfax Violins
“It is a true privilege to be able to observe and learn how to properly perform a violin neck graft and varnish retouching, which are considered to be some of the most extensive and demanding restoration techniques, with Iris Carr as my online lecturer. Iris herself has taught at the BVMA and Oberlin restoration courses for the past decade and is widely regarded to be one of the best violin restorers and teachers in the world. Being able to learn the know-how, at my own bench, at my own pace, and still have the possibility to ask for advice from the instructor, really makes learning these advance restoration techniques possible and enjoyable. Thank you for creating this wonderful online course.”
Allen Liang
1st year violin making/restoration student
“Iris Carr’s course on the topic of neck grafts is extremely thorough, and accessible to less experienced and seasoned luthiers alike. Every step of the process is discussed in depth and demonstrated, in a video production of impressive quality. A rare opportunity to learn and gain insight from the best.”
Eliane Leblanc
Eliane Leblanc Fine Violins
Available Courses
Pricing inclusive of VAT
There is no VAT charged for businesses outside the EU and business entities from European contries other than the UK with a valid VAT ID. Please enter your VAT ID on the checkout page.
The Violin Neck Graft Course consists of Part 1 & 2 which can be purchased separately. There is a discount if both are purchased together. There is also the option of paying in installments over 6 months.
Terms & Conditions
Iris Carr Restorations Ltd is not liable for any personal injury, loss or damage caused by the use of tools or chemicals demonstrated on any course, nor for loss or damage done to any instrument by following the instructions in the videos.
The chapters/videos are protected by Copyright. They are not downloadable and can only be viewed on Teachable. Copying, and/or distributing any content of this course or sharing of log-in details are not permitted and multiple sharing of log-in details will be detected by this site.
Once a course has been purchased, there will be no refund given unless there is a legitimate reason for that request.
For more details, please see Terms of Use.


